Category Archives: DIY

DIY Facial Serum for Night, Acne Prone Skin, Indian Beauty Blog, Skincare

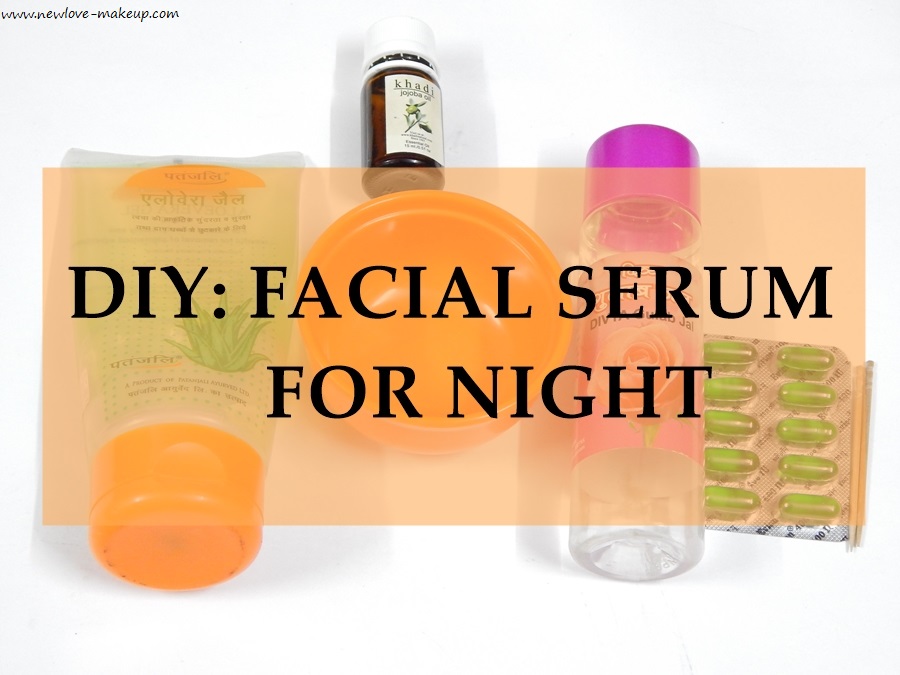
DIY Facial Serum for Night

DIY Facial Serum for Night

By Sanchita

To begin with, I have extremely sensitive, acne prone, oily skin that is always on the verge of breakouts. Due to this reason, I avoid moisturizers (except for aloe vera gel) all my life. However, as I am approaching towards late 20s, I have been noticing that the texture of the skin looks very unhealthy and that natural glow is missing somewhere. Hence, I wanted something to rejuvenate and nourish the skin. After searching high and low for all the ingredients that works on acne prone skin without giving much trouble, I made this night serum for myself and to my surprise, I did work! I have been using it past a month and thankfully I observed some good changes in my skin. Firstly, it never broke me out and also nourished the skin. Secondly, it hydrates the skin throughout the night with getting oily or greasy. So, here goes the night elixir for acne prone skin.

INGREDIENTS:

  • Aloe Vera Gel – you can either take it directly from the plants and blend it smooth to have the gel consistency or simple buy one!
  • Jojoba Oil – Works wonder for oily acne prone skin. You can also substitute it for Avocado OR Almond Oil for preference.
  • Rose Water – either homemade or store-bought will work.
  • Vitamin E Capsule – easily available across the counter otherwise you can also opt for Vitamin E oil.
  • Sanitized Bowl – since it is a face product, it is better to have a sanitized place to start with and then transfer it to a dropper bottle or any container.

STEPS

Step 1
  • Add 1 tbsp. of rose water in the bowl.
Step 2
  • Next, add 2 tbsp. of aloe vera gel. Mix it thoroughly as both the ingredients have different consistencies and takes effort to blend well. You can also add 1 tbsp. if you want a runny consistency but I wanted sort of a slightly thicker one, so I added 2 tbsp.
Step 3
  • Add 2-3 drops of Jojoba Oil and again blend it in.
Step 4
  • Lastly, take out 1-2 Vitamin E Capsules and poke them to take out the oil. Add the mixture very comprehensively unless you see a uniform consistency without any lumps.
Final outcome
  • And Voila! You night serum is ready!

TIP: Do not make it in a large quantity because it is handmade and hence, the preservatives are missing. Make it enough for a week or two at the most.

FOR DRY SKIN – Since dry skin or mature skin needs more than just aloe vera gel, they can use shea butter or cocoa butter instead of aloe vera gel. They can also incorporate the essential oils like Almond, Rosehip, Grapeseed, etc. as per their own preference.

BENEFITS OF THE INGREDIENTS –

  • Vitamin E – Vitamin E is the main ingredient I would vouch for. It has excellent properties to revive and renew the skin cells at night. It treats the scars and marks on the skin due to ageing or acne. Being a great moisturizer, it nourishes the skin well without making it greasy or clog the pores when applied. It soothes and treats the sun burns and regular tanning of the skin. Most prominently, it make collagen that decreases the rate of aging signs like wrinkles, fine lines, etc.
  • Aloe Vera Gel – this is the HG for every oily skin. Seldom moisturizers suit us and we always find our way back to this. Aloe Vera, known as “plant of immortality”, it has numerous benefits for skin. It moisturizes the skin, heals the scars and soothes the skin from acne and nourishes without any greasy layer which gets absorbed in a jiffy. It also lightens skin pigmentation and slows down the ageing sign.
  • Jojoba Oil – it is known to fight wrinkles, stretch marks and cellulite. With high amount of ceramides which cover skin cells, it hydrates and nourishes the skin like no other. Oily skin doesn’t go well with other oils but this is an exception. It is so light weight and gets blended very easily. It also has anti-bacterial properties that treats acne and allergies.
  • Rose Water – the beauty of rose water in indefinite. From toner to face packs, makeup setting spray to hydration – it can do everything. It treats acne, soothes the skin from sun burns, refreshes and invigorates and has many anti-inflammatory and anti-oxidant properties for sensitive skin.

Do let me know how you liked the DIY.

Editor’s Note: I swear by Vitamin E capsules, but they are so sticky and messy while applying. I guess the mix of rose water and aloe vera gel will make applying Vitamin E easier. Also I am all for essential oils, I love using them. Definitely trying this Sanchita.
Acne Scars – Causes, Prevention Measures and Home Remedies

Acne Scars – Causes, Prevention Measures and Home Remedies

By Archana

Hi all,

After many product reviews, I am back with an informative post today. Acne is one common skin condition that many people suffer from. Though it mostly occurs in teenagers, many adults too face it. In today’s post, I will explain the common causes for acne, prevention measures and some home remedies to cure acne scars.

What causes acne?

The four main reasons for acne are:

* Excessive oil production
* Dead skin cells
* Clogged pores
* Bacteria

When our body secretes excess sebum/oil, they build up in the hair follicles and form a soft plug, creating an environment where bacteria can thrive in. This bacterial infection causes inflammation eventually leading to pimples. Whiteheads and blackheads too are actually clogged pores with bacteria and oil.

Some factors like hormonal imbalance, certain foods, stress, etc can trigger or aggravate the acne conditions.

How to prevent the occurrence of acne?

It’s always better to prevent the occurrence of acne in the first place with some good skin care routine.

* Keep your face clean by washing your face atleast twice a day to remove impurities, dead skin cells and extra oil.
* Use a separate towel for your face.
* Change your pillow covers and bedsheets weekly.
* Avoid or limit the intake of deep-fried foods, dairy products, sugar, salty snacks and junk food.
* Avoid using oils, gels and fragrances on your hair.
* Wash your hair often as oily hair can add to the oil on your face.

Home remedies for acne scars:

When a pimple occurs, it can leave behind marks and scars. Though there are many pigmentation creams and anti-acne gels available in the market, home remedies are always more effective and with no side effects. Only thing, they need to be followed diligently for atleast two weeks to see improvement. Here is a list of easy remedies at home to cure acne scars:

Lemon mask for acne scars:

* Lemon juice – 1 tbsp
* Honey – 1tbsp
* Milk – 2 tbsp
* Rose water – 1 tbsp

Mix all the above together and using a cotton wool apply on the acne scars. Leave on for 15 minutes and wash off. Lemon juice is a natural bleaching agent which helps lighten the scars. The rose water helps to soothe the tingling sensation caused due to lemon.

Aloe vera gel for acne scars:

Extract fresh aloe vera gel from the plant and apply on face. You can leave it overnight. Do it regularly for two weeks for the acne scars to fade. Aloe vera not only soothes inflammation but also helps in regenerating damaged tissues and speeds up the healing process.

Cucumber and gram flour face pack for acne scars:

* Half a cucumber
* Gram flour – 2 tbsp
* Turmeric powder – 1 tbsp

Blend the cucumber into a smooth paste. Add the gram flour and turmeric powder and apply as a face pack. Leave for 20-25 minutes and then wash off. This treatment is good for sensitive skin also to get rid of acne scars.

Potato and tomato mask for acne scars:

* Half a potato
* Half a tomato
* Honey – 1 tbsp

Grate the potato and extract the juice from it. Blend the tomato into a fine paste. Add the potato juice and a teaspoon of honey. Apply this mix all over your face and wash off after 15 minutes. Tomatoes contain the enzyme lycopene which help to lighten pimple marks. Potatoes also have skin lightening and bleaching properties.

Cinnamon and honey mask for acne scars:

Add half a teaspoon of cinnamon powder to one teaspoon of honey and apply on your acne scars. Leave it for an hour and then wash off. This mixture has anti-bacterial and anti-inflammatory properties which is effective in treating the acne.

Tea tree oil for acne scars:

This is a proven remedy for reducing acne scars. Tea tree oil is an excellent antiseptic, antibacterial, antifungal and antiviral essential oil. Just dilute some tea tree essential oil in water and apply this solution on your acne scars everyday. Leave it overnight. Follow it regularly to see visible reduction in scars and blemishes.

Apple cider vinegar for acne scars:

ACV is a natural astringent and balances the pH level of your skin. It is effective in the treatment of acne too. Mix 1 part of apple cider vinegar with 1 part of water and 1 teaspoon of honey. Dip a cotton ball in the mixture and apply on scars. Leave it for 15 minutes and wash off. Do this once daily.

Sandalwood and orange face pack for acne scars:

* Sandalwood powder – 2 tbsp
* Orange peel powder – 2 tbsp
* Rose water – 2 tbsp

Mix all the above into a fine paste and apply as a face pack. Leave it for 30 minutes and wash off. According to Ayurveda, sandalwood is a effective soothing and cooling agent to treat skin inflammations. Orange peel powder helps to lighten the marks.

So these are some of the home remedies you can follow to cure acne scars, pimple marks and blemishes.

Editor’s Note: This was a really well written post Archana and the remedies are fab. I think I always stick to Aloe Vera Gel and the fuller’s earth, sandalwood mix. I will surely try the other home remedies mentioned by you.

Which ones have you tried? Share your experiences below.

P.S: Pics from Google

Beauty Hack: DIY SCRUB BAR

Beauty Hack: DIY SCRUB BAR

By Sanchita

Scrubbing is extremely essential in winters as the development of dry skin needs to exfoliate to preserve then natural radiance of the skin itself. Honestly speaking, I prefer my winters with oversized sweatshirt, hot chocolate, a warm bed to snuggle in and reading a soul touching book. Yes, I am one of those lazy girls who like to keep the skin well-scrubbed of dead cells and yet do nothing about it. This is when a dear friend of mine told me to make a ‘scrub bar’ that would clean and exfoliate at the same time. My heart leaped with just with the thought of such multipurpose body care product and I immediately thought of making it. So it’s time, my dear readers of NLM, to let you know how to DIY this amazing thing!

Things you need:

  • Crushed soap bar. (a gel based one works better and easier to deal with)
  • Olive oil.
  • Glycerin.
  • Ground coffee. (not the instant one which blends in but the grounded beans for filter)
  • Empty container.

Steps:

Step 1

1. In a double boiler or on top of a boiling water, place the cut out pieces of the soap. Do not put it directly under the flames which would lead to burning.

Step 2

2. Once the soap melts in heat, simmer it down and add 2 tbsp. of olive oil and glycerin each. Then, mix it well with the liquid soap.

Step 3

3. Now add the coffee in it and again use a spoon to mix it well.

Step 4

4. Remove the mixture from the heat and pour in it the container. Now, this has to be done very quickly as the soap has the tendency to get sticky.

Step 5

5. Keep it in the refrigerator for 1-2hours. It also depends upon the soap on how much time it requires to solidify. Mine was done in 1hour.

Final

6. And you homemade scrub bar is ready to use!

P.S: You can also add big granules of sugar to exfoliate. Sugar is slightly coarser when solidified and hence I generally feel it is too rough for my normal skin but if you have dry skin, you can incorporate that. Also, you can make a separate scrub bar with sugar and walnut particles for feet as well.

As we all know, soaps are excellent in washing the dirt and therefore I added it to cleanse the skin. Olive oil and glycerin is extremely hydrating and hence, while scrubbing you will get the desired moisture to be restored. Lastly, the coffee particles are coarse and semi-fine milled which helps in exfoliation- gently and effectively. It stimulates the blood flow while scrubbing and tighten the skin thereby reduces cellulite and great for anti-ageing.

Overall, this has been a lifesaver for me. I imply invest less time for skin care yet get the best of it. Do let me how you liked my DIY.

Editor’s Note: This sounds amazing Sanchita and I love the coffee smell, definitely trying it out.

Have you tried making something like before? A DIY Scrub Bar? Will you try this? It’s easy peasy.

Acetone v/s Non-Acetone Nail Polish Removers

Acetone v/s Non-Acetone Nail Polish Removers

By Ishleen

Why are acetone nail polish removers so much better for you!

Acetone or Non-acetone—that is the question?

We have been asked times innumerable about the safest way to remove nail polishes, are acetone based removers safe and whether or not non-acetone removers are better for the nails? So here we have a short post which hopefully will appease your queries.

The pondering over the question in regards to the safety of acetone removers is as intense as the heated debate on the health benefits of chocolate. But you do not need to drown in the frenzy of arguments, as we have planned to bring forward some logical set of reasonings.

What exactly is acetone?

Acetone is the second safest solvent in the nail industry, after water. And clearly, we cannot use water to remove nail polishes, because if we could, the nail industries would have never established. Ok, enough on that. Undoubtedly there are many other solvents in the world, but none are as safe as compared to acetone.

Does acetone have any health hazards?

Health hazards? No, not any that we have heard of. Some people tend to believe that acetone has the potency to aggravate carcinogens and thereby cause cancer. This is NOT THE TRUTH. No scientific institution or research has ever proved this.

Secondly, the market hype about non-acetone nail polish removers has made people believe that acetone can get absorbed by your skin and in the process can get mixed with your blood stream. Girls, acetone CAN NOT pass through the dermis level of your nail bed. Acetone gets evaporated a bit too fast to get absorbed into your nail plate. So, it’s safe.

Why should you choose acetone removers over non-acetone polish removers?

Markets today have very strategically created the image of non-acetone removers to be the better version of acetone removers. In reality this is not true. Acetone based nail polish removers are slightly safer than non acetone removers, which basically constitute methyl ethyl ketone and ethyl acetate. Both of which are harmful for the healthy growth of nails. Surprised much?

Coming to the argument that acetone removers are drying, we could not contest it. But so are non- acetone removers, undoubtedly. In fact non-acetone removers are much more drying than acetone removers as they are not as effective as acetone removers when it comes to removing nail polishes.

Non-acetone removers were made to work basically with acrylic nails, as they used to get dissolved when tampered with acetone removers. Thus they are less effective than acetone removers, there by leaving us with no other choice than to let it be in contact with the nail and nearby skin for longer periods of time. This causes much more dryness than any ordinary acetone remover.

What to do in order to avoid dryness caused by acetone based removers?

The basic question is why do your nails feel dry after setting in contact with acetone removers? Remember when I told you that acetone was a good solvent and it dissolves all the polish very effectively. Similarly, acetone being a solvent also dissolves the natural oil and moisture from the skin surrounding your nail bed. Simple enough, eh?

Talking about the solution, it is a complete no brainer. Feed the skin with what the acetone could rip it off of. Oil! I mean if the acetone tends to strip off natural oils from your skin, slather some olive or almond oil on to the skin (not the nails, just the surrounding skin) which will be getting affected by oil.

By doing this one simple step, the acetone will be dissolving the oils applied externally, safeguarding most of your natural oils and moisture in the skin. Easy peasy!

Ok, so I am in a good mood today. Let me just throw in a bonus trick for you gorgeous girls to enjoy.

BONUS TRICK: Gel nails are beautiful and they are all the rage in the nail industry nowadays. But let us accept it, they can be expensive; and the additional expense to get them removed at the salon can be too overwhelming for some. Now, that we know that acetone is far better than non-acetone removers, let us try a simple trick here. Dab some oil on to the skin surrounding your nails. Taking a cotton swab completely doused in acetone nail polish remover place it onto the nail and cover the nail with a foil paper (the one sitting handy in your kitchen) and let it be for about 3-5 minutes. Do not unwrap the foil; just pull it straight off the tip along with the cotton.

The same trick can be used to remove chunky glitter polishes, but the acetone dipped cotton covered with foil should not be left on the fingernails for more than 3-5 minutes. It can damage your natural nail bed.

After all the heated debates and settled arguments, I have finally come to the conclusion that acetone removers are all the much better than non-acetone nail polish removers for your skin.

The only problem that acetone can cause is drying and to avoid the unquenchable-nail feeling, you can try the following acetone based DIY recipe for gorgeously nourished nails. Just take:

1. Ten parts acetone (any kind of pure acetone will do)

2. Two parts of water (normal or tap water)

3. 10-15 drops of any oil of your choice (I personally prefer using olive oil)

4. 5-8 drops of vitamin E (you can even use one or two vitamin E capsules for this purpose)

Just add these four simple ingredients into any old nail polish remover bottle and voila! You have a customized acetone based nail lacquer remover which will remove the most stubborn of nail polishes without ever drying your nails. I swear your friends will be jealous of your beautiful nails 🙂

Editor’s Note: That’s quite an interesting post Ishleen, also loved the last DIY recipe and would be trying that out. I have tried acetone free ones thinking they are all good, but the nail paint just won’t come off :/ I usually love using this oil based nail polish remover pads. This DIY thing sounds quite good and economical.

Have you tried non-acetone nail polish removers? Don’t you find them drying plus they do not take off the nail paint at all! Will you try this DIY recipe?

P.S: Images from Google

MeMebox Special #31 Earth & Sea Cosmetics- Unboxing & Review

MeMebox Special #31 Earth & Sea Cosmetics- Unboxing & Review

If you don’t know what a MeMebox is,read HERE. I got my first  Colour Box #1 in Red at first (reviewed HERE). This time they offered me to try a box which would be a surprise. I love surprises! So I was IN for it.

When I received the box,it was super heavy. (My previous box was makeup, so was quite light. This time it was skincare) It was this #31 Special Earth & Sea Cosmetics Box. It has 6 full sized skincare products!! Its bound to be heavy.

#31 Earth & Sea Cosmetics: When toxins, dirt and oil build up get under the skin, its waste-filtering system gets jammed, ultimately clogging up pores and making skin look dull. So, we’re bringing you nature’s clean up crew to clear the way for cleaner and brighter skin.

Charcoal, volcanic ash and mud all work together to draw out dirt and excess oil to extract stubborn impurities from deep within pores! Mineral rich marine energy works as the step 2 treatment for refining pores and replenishing moisture to the skin.

Our Earth & Sea Cosmetics Box offers the best natural ingredients to give you your best looking skin yet.

MRP: $29.00

Shipping cost: $6.99

Products in the box:

SECRET NATURE Volcanic Ash Pore Pack 100g- retails at $36
Enriched with organic Jeju complex and mineral rich volcanic ash, charcoal, green tea, and pine needle extracts, this Volcanic Ash Pore Pack works wonders for the skin by controlling excess sebum and tightening enlarged pores. Plus, it’s free of parabens, artificial fragrances, and artificial coloring, and is suitable for all skin types!

It looks very similar to the Innisfree Volcanic Clay Pore Mask!

ARIUL Spa Water 24 Hours Moisturizing Refreshing Mist 100ml -retails at $18
Ariul’s Refreshing Mist is made from pure spa water extracted straight from Beligium and extremely rich in minerals, various amino acids, and moisture. It works to deliver an instant replenishment into your skin, creating a moisture barrier for preventing any dehydration for the next 24 hours at the least. It also be used as a boosting serum for enhancing absorbance of other skincare products.

I love thermal water, spring water, spa water mists. Avene Thermal Spring Water is my all time favourite. Looking forward to trying this out.

ELIZAVECCA Elastic Pore Mask Cleansing foam 120ml- retails at $29

Suck out dirt out of your pores with charcoal while collagen extract from pig skin firms and hydrates skin. Spider extract makes this cleansing foam extra refreshing and suitable for sensitive skin.

WHAT IT DOES: Keeps skin feeling moisturized while removing excess oil and dirt from pores.

HOW TO USE
1) Apply appropriate amount on dry face. If too dry, use a tiny bit of water to spread cleanser evenly on entire face. Wash off with lukewarm water after 3~5 minutes.
2) After removing makeup, wet face. Massage a small amount of cleansing foam into creamy foam to remove excess makeup. Wash off with lukewarm water.

I like the fact that it acts both as a cleanser and mask. I know the spider and pig collagen extract does not sound good :/ But the Koreans and Chinese have the best skin in the world, all these weird things should be the secret. Definitely want to try this first :p

TOSOWOONG Super Aqua Cooling Gel 80g- retails at $34

The Super Aqua Cooling Gel is an ultra-cooling cream gel that provides long-lasting freshness and comfort to the face and body. Full of minerals and nutrients from glacier waters, this gel is ideal for cooling overheated skin and relieving irritated skin. Deep sea minerals also strengthen and moisturize skin so that you can have firm and supple skin all day long.

HOW TO USE: Evenly distribute a penny sized amount onto skin and massage until fully absorbed. Use daily morning and night after toning the skin.

It is supposed to be a moisture bomb and suitable for all skin types from oily to super dry. Its moisturizing and creates a moisture film on the skin and there is no oiliness or greasiness. If it delivers what it claims, this will be my go-to product for this winters.

DEWYTREE Mineral Healthy Sun Cut Loose Powder SPF36 PA++ 10g- retails at $34

Dewytree’s loose powder is enriched with natural minerals and essential oil for maintaining your skin’s moisture level and leaving a long-lasting silky finish to your makeup. Plus, it has a UV protection level of SPF 36 PA++ and uses an air pocket puff that does not clog pores with powder application.

Loose powder with minerals and essential oils plus sunscreen protection. Bring it on. I am yet to try on the shade, I hope it matches :/

SHARA SHARA Black Charcoal Mask Purifying 23g- retails at $2

Shara Shara’s Black Charcoal Mask contains high concentrates of charcoal powder and volcanic ash complex for clearing your skin of dirt, impurities and sebum clogging up your pores. It also works to soothe and protect sensitive skin with its wine and aloe vera leaf formula.

Again charcoal and volcanic ash. This time with wine and aloe vera. Sheet masks are easy to use, can be carried anywhere and I love how they are dipped in rich,moisturising serums and give an instant boost to the skin anywhere!

I think this box is perfect for people with oily skin or pore issues. So many products with volcanic ash, clay, charcoal and for deep cleansing. Its like a DIY clean up at home. Definitely recommend this box!

You can buy it HERE. By the way, the winners of the MeMebox giveaway are declared! Congrats guys, hope you get an amazing box of your choice. Do share the pics with me.

Have you tried MeMeBox before ? Which is your favourite ?

DIY Hairstyles with TRESemme India

TRESemme Ramp Ready Hair: DIY HairstylesHey everyone,

Are’nt we all always on the look out for DIY easy everyday hairstyles which can be done in minutes ? We all get bored of our normal look..and end up getting funky haircuts time and again..

Well worry not..now we have Tresemme India to our rescue..they have come up with easy DIY hairstyle videos..check them on their youtube channel HERE

I tried some of these hairstyles..Athena Braid, Butterfly Ponytail and the twisted hairband..so loving them !

Athena Braid

Here is the video of how to create an Athena Braid

Butterfly Ponytail

I loved the Butterfly Ponytail…its quiet easy and can be done in a minute..

Twisted Hairband

And the twisted hairband too


Please note, hairstyles may appear a little different on me coz I have layered hair and not straight.

Messy Hair Bun

And last but not the least my go to messy hair bun..here is a step by step guide..

1. Brush through hair to get rid of knots.
2. Hold hair up in a high ponytail.
3. Holding the end with one hand, start twisting the hair around the end in a clockwise direction.
4. Tuck the ends inside.
5. Secure with a rubber band.
6. Done !

I hope you like these styles..which did you like the most ?

Which hair styles did you try from the TRESemme videos ?

Four Yummy Homemade Body Scrubs

Four Yummy Homemade Body Scrubs
Many ingredients from your kitchen can be used to make yummy-smelling face, body, and foot scrubs at home. Start with a skin-friendly exfoliant, such as oatmeal, cornmeal, sugar, or salt. Then choose a moisturizing, binding ingredient. I recommend honey and avocado, which are non irritating emollients, for the face. Olive or coconut oil will work well on the body and feet, especially on dry, scaly, or flaky skin.

However, if you tend to get breakouts on your chest or back, skip the oils and stick with honey or yogurt.

You can add other ingredients as well, such as fresh citrus juice (which acts as an astringent) or cucumber (which soothes skin). For a more aromatic scrub, add some fresh herbs or a few drops of skin-friendly essential oils. I love dessert, so I like cinnamon or vanilla in my scrubs — if you’re a chocoholic, try adding cocoa!

Below are a few recipes to get you started on your own scrubs:

Simple Cinnamon-Vanilla-Oatmeal Facial Scrub
1/4 cup oatmeal
1/2 teaspoon cinnamon
1 teaspoon vanilla extract
2 teaspoons honey
1 tablespoon plain yogurt

Cornmeal-Citrus Facial Scrub
1/4 cup cornmeal
1 teaspoon fresh-squeezed citrus juice (lemon, lime, orange, or grapefruit)
2 teaspoons honey
1 drop ylang-ylang essential oil (optional)
1 drop ginger essential oil (optional)

Avocado-Strawberry-Sugar Body Scrub
1 cup sugar
1/4 cup mashed avocado
1/4 cup mashed strawberry
1 teaspoon olive oil
1 teaspoon honey
1 cup minced fresh basil
1 drop rose essential oil (optional)

Rosemary, Mint & Salt Foot Scrub
1 cup coarse sea salt
5 tablespoons olive oil
3 sprigs fresh rosemary (remove leaves from stalk)
1 cup minced fresh mint
3 drops peppermint essential oil (optional)

Mix ingredients together and gently scrub your face, body, or feet. Rinse with lukewarm water and pat dry.

Don’t they all sound so good enough to eat ! Yumm…the warm vanilla cinnamon..

Additionally you can scoop out a papaya or mango (or avocado) and save the fruit to eat later. Rub the inside surface of the skin all over your face and arms. The antioxidants and fruit enzymes will help soften your skin.

Source: 1

Whats your favorite homemade scrub ??

Problems and Solutions : Ingrown Hair

Problems and Solutions : Ingrown Hair

 Hi,

I am starting a series of problems and solutions. I have covered Dandruff problem before here. Now I am dealing with the problem of Ingrown Hair today which most of us face…even I do sometimes if I do not exfoliate skin well…or post waxing for few days..till hair completely grows out.


What is Ingrown hair?

 Ingrown hair, or razor bumps, occur when the shaved or waxed hair gets trapped inside the hair follicle and curls or  grows back sideways into the skin in the follicle or fails to grow outwards and stays embedded into the skin.

 What causes it?

 Anything which causes the hair to be broken off short with a sharp tip can cause ingrown hair. Shaving is the leading cause, followed by waxing and tight clothing.

Symptoms:

  • Rashes
  • Itching skin
  • Bumps
  • Sometimes pus and infection
  • Inflammation

How to prevent it ?

The best way to  prevent it is by letting it grow..and not bothering it or cutting it in between. Exfoliate regularly so that the dead cells go away from the surface of the skin..and my dermat had recommended me to moisturise my skin well…as even dry skin can cause the in growth of hair. Wear loose clothes and give the skin some space.

 How to treat the already ingrown hair?

 1. Use a warm moist cloth and press it several times against the ingrown area…to soften the skin and let the hair come up on the surface…this is the most basic method. But if your ingrown hair does not come up you need to follow other methods as some grown inside are a little stubborn.

 2. Regular use of salt and sugar scrubs over that area..but if you have broken skin do not use salt scrub even anywhere  near that area.

 3.  Use of acne medication like salicylic acid benzoyl peroxide over the affected area…what you can do is make an aspirin mask..by dissolving it in little water and apply on the affected area.

 4. Last resort would be physically plucking it with tweezers..but be careful that you do not harm your skin or bleed in the process..though you do need to sanitize properly before doing it…stay away from alcohol based products as they would further dry the area making it worser.

 If you suffer from this problem too much..you can even go for permanent laser hair removal or electrolysis.