Category Archives: Tips

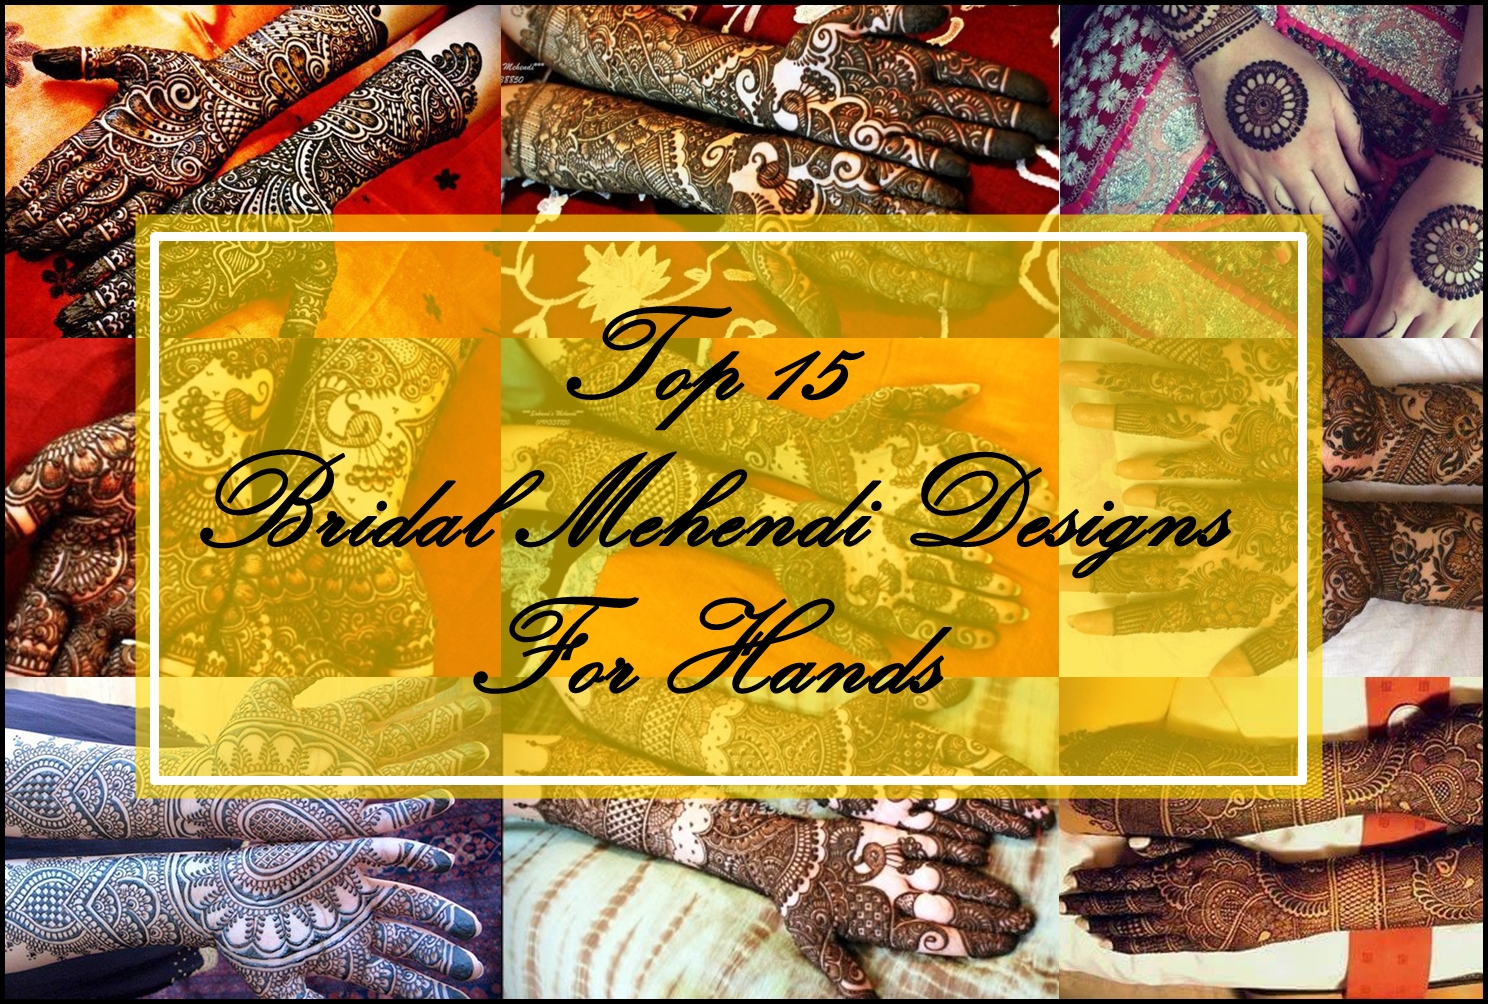
Top 15 New Bridal Mehendi Designs for Hands, Indian Bridal Blog, Indian Beauty Blog

Top 15 New Bridal Mehendi Designs for Hands

Top 15 New Bridal Mehendi Designs for Hands

Hi guys,

If you know I had my ‘Mumbai Bridal Diaries’ series covering my engagement and wedding and all posts related to that, see HERE. I am kick starting the Bridal Series again as the wedding season is approaching and what better than starting with mehendi designs.

Sanchita will take from here..

Hello everyone,

Bridal season is going to start soon and I am sure the would-be brides are busy planning everything. Internet, now-a- days, is flooded with every bridal need – from hair style, makeup artists to lehengas. But with so many choice it becomes very difficult to choose the one for your D-Day. Therefore, we thought of bringing you the Bridal Diaries where we would short listed the best of the best for everything a bride needs. This time we came up with the best bridal mehendi designs for hands.

No matter which part of India you belong to, mehendi is a must have thing for the brides except for few traditions. Mehendi has been a part of marriages since time immemorial and there is a reason why the bride applied mehendi or henna on her hand. Firstly, weddings are stressful and tiring and applying henna, which is a very powerful medicinal herb, helps to cure the headache.

It cools the body and keeps the nerves from becoming tense. This is the reason why mehndi is applied on the hands and feet, which house nerve endings in the body. It is also antiseptic and protect from viral diseases. Further, improves blood circulation in the body and improves general health.

It is also considered to be a sign of good luck and festive occasion. Traditionally, it says that mehendi has a rich smell that act as a powerful aphrodisiac and boosts the romance in the initial days of wedding. It is better to use the pure and herbal mehendi or henna which is derived from plants to be used on hands. Chemical ones often causes irritation and contains toxic chemicals in it. The mehendi should be dark burgundy, brown or coffee in color, especially which are natural.

Let us see the wonderful mehendi designs for hands.

1. Peacock designs are the common favorite for everyone when it comes to bridal designs. It has a very feminine and gracious look and widely used in various ways.

2. This is another full hand peacock design but the designs are extremely elaborate. It has several floral and leaf patterns in between which would look flattering for the wedding.

3. A rich floral design which is extremely easy to translate. When the mehendi stains the skin with its deep brown or coffee color, the flower seems to almost come alive in all its glory.

4. An elegant peacock mehendi design with floral patterns. The combination is beautiful.

5. Circular motifs are wonderful and has an aesthetic appeal to it. They look beautiful and well decorative. This is a wonderful design who wants simple and elegant look.

6. A typical bride-groom design. What can be better than this for a wedding?

7. A fine art floral design with semicircular pattern. It has a very soothing touch to it.

8. A full hand floral design for the brides.

9,10,11,12 – These are all the peacock designs combined with the floral and Arabic pattern. All the designs are ideal for weddings.

13. A diamond shaped elaborative floral designs for full hand.

14, 15. The floral and leaf designs combination tiny paisleys are woven together to create a delicate design pattern, the result is a very alluring and looks amazing.

Tips to make mehendi last longer on hands –

  • Keep the mehendi on the hands for a minimum of 8-9hours. It is best if you can keep it for a whole night, around 12hrs of so.
  • Make sure the hands are dry when you are applying the henna or mehendi.
  • Make a juice of lemon and sugar syrup or powdered sugar. The mixture will be sticky but this will give a glorious color to the hands and shine as well.
  • You can also warm the hands under a light or heated box.
  • Use mustard oil to remove the scrubbing particles when you are going to remove it. Take few drops on the hands and rub together to remove.
  • Do not use water for a few hours after taking off the mehendi particles from hand. This will make the color even richer and will last longer on hands.

Editor’s Note: These are some beautiful designs Sanchita, loved the compilation! I loved the no.6 Bride Groom and last no. 15 especially.

Which is your favourite?
DIY At Home Facial with R.K’s Aroma Moringa Facial Kit

DIY At Home Facial with R.K’s Aroma Moringa Facial Kit

Hi guys,

So I did a facial yesterday at home and recorded it for my YouTube channel, I used this R.K’s Aroma Moringa Facial Kit and hence I thought of reviewing it here too and showing you guys the video..

What is Moringa? The super plant Moringa is native to Africa and Asia, and is widespread among the lush, green foothills of the Himalayas. It belongs to the Moringaceae family, and derives its name from the Malayalam word, ‘Muringa’. Its leaves, pods, fruits, flowers and bark are all abundant in restoratory and healing properties, making it a powerhouse of nutrients and anti-oxidants; a bounteous natural agent, generous with its benefits, truly worthy of the moniker ‘miracle tree’.

Benefits of Moringa: Moringa is rich in vitamins C and E, and contains over 30 different natural anti-oxidants, minerals, phytonutrients and natural anti-inflammatory agents that gently soothe the skin. Perfect for everyday use, Moringa prevents the onset of blackheads, acne, fine lines and wrinkles, and protects from sun burn and minor skin infections. It softly cleanses the skin without robbing it of its natural radiance, while its anti-ageing properties rejuvenate and bring it to life.

Directions:

1. Clean the face with Moringa Cleansing Lotion to cleanse and minimize the pores.

2. Apply Exfoliating Scrub and gently massage for 5-7 minutes for skin exfoliation. Clean the face with wet cotton. Steam your face for 2-5 minutes.

3. Now take Moringa Cream approximately 3-4gms and add 2-3 drops of Moringa oil and massage for 10-15 minutes. Wipe off the excessive cream with cotton or tissue.

4. Apply Moringa Gel and massage for 5-8 minutes and wipe off the excess.

5. Apply Moringa Mask by mixing it with required amount of water, keep it for 5-10 minutes until it dries off and then wash it off with lukewarm water.

6. Complete your facial by applying Moringa moisturizing lotion.

MRP: Rs. 210/- (Buy HERE)

More R.K’s Aroma Products on Amazon HERE

First off this range smells absolutely amazing, Moringa skincare range is available in many brands and you have must have seen/heard of it before. Even The Body Shop has a Moringa Range.

This pack contains 7 sachets of Cleanser, Scrub, Massage Cream, Oil, Gel, Mask and Moisturizing Lotion. Though it’s a one time use kit, the quantity is enough for two people to use together but you have to use it at the same time since once opened, it is difficult to store sachets.

You can do it with your BFF or your mom or sibling, you can do the facial on each other. Make sure you have no rings, watches, etc., and your hands are bare.

The cleanser is milky white and takes off your basic makeup and cleanses your pores. The scrub is super creamy and glides on the skin really well, the exfoliating beads are not that gritty and feel very comfortable. This scrub would work even for sensitive skin.

I took a steam for about 3-4 minutes and then went ahead with the massage.

You have to mix the massage cream and moringa oil together and then massage it all over your face for about 10-15 minutes. Now this is the main part in any facial. Concentrating on pressure points and going with outward strokes to drain lymphatic fluids from your face and skin. If you are someone who has a bloated face, under eye bags, etc., you have a lot of lymphatic fluids which are not drained properly and a good massage definitely helps in draining those out. Plus boosts your circulation and gives your skin a nice flush and glow.

This is followed by the moringa gel which is again massaged for about 5 minutes. It’s a semi-transparent gel and again glides on the skin really well for a good massage.

Then comes the face mask. It’s in powder form, so needs to be mixed with water and applied evenly all over the face. I kept it for about 10-15 minutes and washed it off.

At last, the moisturizing lotion to complete the facial.

I absolutely loved the results! My skin was so soft, smooth, supple and hydrated. The redness I had before the facial, was all gone in 2-3 hours and it was soothed. Facial results are best seen the next day and my skin is glowing today! If you follow me on Snapchat (bhumika_t), you must have already seen my #NoFilter #NoMakeup bare face selfies and how I am loving my skin!

It also did help in getting rid of a little tan. Overall skin is more brighter and glowing. I definitely suggest checking R.K’s Aroma products and especially this new launch, the Moringa Facial Kit. Many of their products are available on Amazon and I have linked them above.

Pic the next morning..

Usually the skin is a little red on the same day of the facial, but the actual results are seen the next day. I am so loving my skin right now!

Few pointers before any facial:

  • If you have undergone bleach or any face treatment, do not try this for at least 4-5 days
  • Use a sunscreen if you are stepping out after this facial, as your skin might be a little photo sensitive
  • Do not use a face wash for one day, you can wash your face with normal water. You can use a face wash the next day
  • Since all essential oils do not suit everyone, it’s better if you do a patch test on your chin or jaw line first.

All R.K’s Aroma products are pH tested and suitable for sensitive skin. I am a big fan of aromatherapy oils and products and having talked to the owner, I am so curious to try more of their products. They have about 30000 products and the owner Mr. Prakash Shivdasani himself is a chemist and makes these formulations.

Also I am giving away two of these kits to two winners on my YouTube channel, so join HERE.

Have you tried any R.K’s Aroma products/facial kits?

The Fashion Trend – Kurti

The Fashion Trend – Kurti

By Sanchita

Introduction –

Hello everyone,

Online Shopping is in full swing these days, and with the amount of discounts and sales, it also turns out to be very lucrative!

When it comes to the well-defined ‘Indian wear’, the first thing that comes to our mind while walking towards the closet is Kurti. This fashion trend never goes off and one of the best smart casual wear. In fact, Kurtis are so versatile that you can wear them for college, office, family events, day-out, party wear and literally every way you prefer.

Kurtis can be made adaptable with various styles like short or medium length, from various materials of cloth and the embroidery as well. thus, the exclusive designs, elaborate patterns, various hues and appealing shades blended with western as well as Indian styles has made Kurti so popular as a fashion trend. There are various reason to love them, different ways to pair them up and the hacks and style quotients – which we are going to elaborate in this post. Read on to know more about it.

Why women love wearing Kurti?

• The first and foremost reason is the comfort factor. Imagine wearing an exquisite outfit but it literally takes your life away because you are not comfortable in it. There things will never happen to a Kurti because they are the most comfortable outfit that it kept in your closet. When comfort and fashion is blended in an outfit – nothing can beat the beauty of it.

• Like I have mentioned before – Kurti can be worn to innumerable occasions and thus you can simply style it the way you want.

• Accessories – this is another advantage in which you can wear a single Kurti several times and each time you can accessorize it and make it look new. While going traditionally Indian, pair it up with bindi and bangles. For the casual look, use a choker or a simple pendant, for some layering, use a scarf and you can also add a layer of traditional jacket on top. Kurt can also be paired up with waistcoats for office and formal wear.

• Kurtis are pocket friendly. This is one of the most important reason. It is literally not possible to shell out big bucks on designer clothes every time and for casual and funky wear, opt for Kurti readily available in the marketplace. Various Kurtis in different shades, styles and cut are available both online and offline.

• Kurtis can be paired up with various ways and styles which we are going to discuss later in the post. This is why Kurtis are worn by every girl out there and are so much loved and accepted.

Style Trend and Fashion Quotient on Kurti –

Regular Style Kurti – This is probably the most common style of Kurti available in the market. It has the Chinese collar and also known as the princess cut Kurti. It is generally paired up with contrast leggings, treggings, churidar, skinny jeans or jeggings.

Anarkali Kurti – Anarkali Kurtis are the long flowing ones which reaches up to the ankle or knee as per the style and occasion. It is a perfect pick if you have a body shape of Hourglass, Pear, Rectangle and Apple. The styles are extremely ethnic and soothing.

A-line Kurti – these kind of Kurtis are extremely popular for trendy casual wear.The cut reaches to the calf or ankle and it has flare from the waist for making ‘A’ shaped panel. These are best for Apple shaped body and Pear shaped body type.

Trail cut Kurti – Trail cut Kurtis are extremely easy to carry. They have a C-cuts on both the sides and the material should be flattering like georgette, chiffon, silk and not cotton.

Dhoti Style – This is one of the newest trend in Kurti where the typical Kurti is cut in a contemporary style and it is so comfortable to wear in summer and monsoon. In this pattern, the lower portion of the material is cut in drape style and flatters feminine curves so graciously. This style can be worn by all body shapes.

Short Kurti – if you want something casual, opt for short Kurti which looks very similar to tops and tunics. This is a perfect casual wear and has a blend of Indo-western touch to it. Thus, you can pair it up with jeggings, jeans or even colored pants as well.

Gown Length Kurti – this kind of Kurtis has a rich feel of Indian traditional look and has been worn by various celebrities on the red carpet in India and abroad. It is very similar to Anarkali ones but reaches up to the floor length. A basic leggings would suffice to complete the royal look with detailed jewelry.

Side Slit Kurti – One of the hottest trend of 2016 is the side slit Kurti. These Kurtis are basically long and straight in cut with lengthy slit from the waist. The length of the Kurti reaches up to the knee or beyond and you have to pair it up to with an elaborate leggings or pants. They are extremely fancy and easy to carry off.

Shirt Kurti – The Shirt Kurti is very similar to the shirt dress. The collar of the Kurti resembles of a formal shirt. This style is a fusion of Indian and western trend and a great choice for the office wardrobe. You can also accessorize it with belts and jackets.

High Low Kurti – Just like we drool over the High-low dress, the High-low Kurti is also in great demand. In this type of Kurti, the front hem is shorter compared to the back. The style adds so much grace and elegance to the outfit and best paired with treggings, jeggings, and skinny jeans.

Kaftan Style – There are days when we prefer ultra-casual and comfortable outfits yet wants to look pretty and sophisticated. The Kaftan inspired Kurtis are the best possible options and can be paired up with treggings, jeggings, skinny jeans and even full tight slacks. The Kurti is also worn short and long as per your choice.

The different ways to team up the Kurti –

With Leggings – This is a very common style in which we generally pair up the Kurti with a color matching or contrasting legging. Leggings are extremely comfortable to wear and are easily available as well. There are different colored leggings, printed leggings, leggings with sheer paneling, and so on to match your style.

With Jeggings and Skinny Jeans – Jeggings and skinny jeans are totally rage now a days and it is a great way to pair up with Kurti. You can wear your favorite Kurti with your fitted jeggings or jeans for college or office wear. This looks casual and stylish at the same time.

With Shorts – Remember Alia Bhatt in 2 States? It was an absolute delight to watch how she pair up a short 3/4 th sleeve Kurti with a pair of denim shorts. So, next time you want to wear the shorts in the most casual way without turning too many heads, pair it up with a simple short cotton Kurti.

With Boyfriend Jeans – generally boyfriend jeans are flabby and loose but super comfortable to wear. Therefore, wear a sleeveless short Kurti with a pair of boyfriend jeans for a nice casual look. This is perfect for summers as well.

With Long Skirts – Kurti can also be paired with long flowy skirts as well. We have seen a number of Bollywood celebrities pulled off such an ethnic combo of Kurti and long skirt and we love the way it turned out to be. It gives a girl-next- door look with such polish and élan.

With Accessories – Kurti can also be accessorized in various ways. To add an ethnic touch, wear a dupatta with it. For casual look, you can add a scarf around the neck. Further it can be accessorized with bangles, earrings, bracelets, belts, head chain for a bohemian look, etc. as per the style and occasion.

With Palazzos – Kurti can be paired with flared pants or palazzos as well. These are extremely comfortable in summers where you want something loose fitted yet stylish. Palazzos and Kurti is also a killer combo for girl with long legs. Just make sure that the Kurti has no flared bottom. In fact, the sleeveless, long, straight, printed Kurti gives decent professional look with matching plain palazzo.

With Dhoti Pants – Dhoti pants are also coming back in fashion and the several pleats around the thigh area gives a nice flattering touch to the curves. Mix and match your dhoti pants with the Kurti and see how stylish it turns out to be.

Thus, these are the stylish and fashionable Kurti trend which has so many variants and can be paired in a number of ways to perk up your wardrobe.

Image Source: 1

So, which one is your favorite?

Touch Nature Lemongrass Essential Oil Review, Benefits, How to Use

Touch Nature Lemongrass Essential Oil Review, Benefits, How to Use

By Nidhal

They smell heavenly. They are perfect pick-me- up items to uplift your senses and lull you into a soothing slumber. Popularly used in aromatherapy sessions, essential oils, EO for short are highly concentrated, potent and therapeutic oils that need to be necessarily blended with a carrier/base oil for external use (and they are strictly not meant for internal uses). A base oil is simply any oil that mellows down the potency of the essential oil to the extent that its goodness isn’t reduced but it becomes conducive for use on skin.

The bottom line- Always, without fail, dilute essential oils in a base (or more than one) oil such as- virgin coconut oil, extra virgin olive oil (EVOO in short), virgin sesame oil and so on and so forth for use on skin/hair. Also, add only a few “DROPS’ and not teaspoons/tablespoons of the essential oil into the carrier/base oil. You stand the risk of scalding your skin if you add more than a few drops of essential oil to the base oil.

With these basic ideas in my, I zeroed in on TOUCH NATURE NEPAL LEMONGRASS ESSENTIAL OIL one fine afternoon as I was strolling the streets of Kathmandu, Nepal in 2014 🙂 The people are the epitome of courtesy , warmth and civility by the way. Coming back to the topic, let us begin with how the essential oil fared for me and how I used it for my skin and hair.

PRICE – 350 INR for 10ml (Buy similar from Soulflower HERE)

DIRECTIONS FOR USE- Dilute in a base/carrier oil of your choice, depending on your skin’s condition and use topically.

INGREDIENTS- Pure lemongrass essential oil

WHAT IT CLAIMS- Lemongrass (Cymbopogon) is a perennial plant in the Poaceae grass family and is native to the tropical and subtropical area of India, Cambodia, Indonesia, China, Guatemala, Sri Lanka and Malaysia. It flourishes where the soil is slightly sandy and the climate moist and war. Lemongrass essential oil has anti-bacterial, anti-fungal, anti-inflammatory, anti-pyretic, anti-oxidant, astringent and diuretic properties.

MY EXPERIENCE-

Packed in a minuscule glass jar with a plastic cap on top and a layer of plastic covering with already perforated holes inset, the packaging of the essential oil is simple, spillage-free and travel-friendly. Yes, the provision of the double layer packaging makes it easy to carry without the fear of leakage. However, I wish a dropper was furnished so that drawing out the oil would have been easier. So, that is my input.

The oil has a riveting aroma. It uplifts you truly! The oil does not have a greasy/oily/thick texture but is fairly runny (as I see). One is not supposed to put it on one’s skin without dilution hence, I never risked doing the same.

FOR MY SKIN – I blend 3-4 drops of this lemongrass essential oil into two tablespoons of extra virgin olive oil and then, massage it on my skin especially after a bath for that ensures better absorption 🙂 Result? My skin feels hydrated, smoothed out and softened throughout the day besides emanating a lovely aroma that keeps me fresh

FOR MY HAIR- I mix 2 drops of this lemongrass essential oil with 2 tablespoons of virgin sesame oil (which is slightly warm for I prefer hot oil massages). Never mix the oils and then heat the resulting mixture. Do not even heat virgin sesame oil too much else or it may emit flames of smoke, indicating that all its goodness is going in for a toss. Simply heat the virgin sesame oil for a minute or two on LOW FLAME and then after a minute or two, add 2 drops of lemongrass EO. Mix well and apply on your scalp.

Keep it overnight and then apply a mask (optional step) the next morning, shampoo and condition as usual. You will end with shiny, hydrated and softened hair which I did  Oh yes, as far as my experience goes, I find it suitable for use by all skin types except those with excessively dry skin. All hair types can go for it.

GOOD-

1. Riveting aroma. It sends one’s olfactory senses into a tizzy. In one word- Heavenly 

2. Well-packaged

3. Well-priced. Most essential oils are within this range so, one is not being overcharged.

4. Perfect for aromatherapy sessions.

5. Can be added to hair masks with a foul odour to camouflage the smell.

6. Can be added to face masks in order to elicit a soul-stirring aroma.

7. Imparts a glow. I have added a few drops of the same to extra virgin olive oil and used on my face and neck (which is dry)every night for two months. Hence, can vouch for it. Please note, I said “drops”.

BAD-

1. Very difficult to find. I have not been able to find it in India. It is obvious since it is made in Nepal but even if searched online, one is unable to find to find it.

RATING – 4/5

DIY Eyeshadow Primer

DIY Eyeshadow Primer

By Simran

We have all been new to the makeup world some time or another and learnt everything by trial and error. One thing which comes in the mind of a person new to makeup is; affordable makeup products since they haven’t mastered any techniques and hence need affordable options to experiment and learn with.

And for anyone trying their hands on eye shadows, is to get a good eye shadow primer, that should be the prime objective. An eye shadow primer acts as a base for your eye shadow, makes the pigmentation of the eye shadow more visible and helps in the staying power of the eye shadow on your lids.

However, there aren’t many affordable options available in the Indian market. When I started using eye shadows, there were barely any primers available, even the costly ones.

So, I DIY-d my very own eye shadow primer and used it for ages till I got an actual eye shadow primer from the market. Hopefully, this will help anyone new to makeup or someone who wants to save some bucks on an eye shadow primer.

It consists of basic things which we all have lying around anyways. It works the same as any eye shadow primer in the market would.

What you’ll need: 

  • Foundation
  • Concealer
  • Body Butter or Thick Moisturizer
  • Empty and Clean Tub
  • Toothpick

Starting with, you’d want to sanitize the tub you want to keep your primer in.  I have used this old lip balm tub and sanitized it. You can even buy empty tubs similar to these online.

Step1

Initially, you want to pour some foundation in the tub, the foundation is the base of the product so you should use the most of it depending on how much eye primer you want to make. I am using this Foundation by the body shop in my eye shadow primer.

Step2

Next, put in a little concealer, use it lesser than the foundation, half than how much foundation you used to be precise. It will help in adding that little brightness in your eye shadow primer. I am using this Deliplus concealer I had got from Spain.

Step3

Finally, put a bit of body butter or thick body lotion, you shouldn’t use a light/thin consistency moisturizer since it would make the consistency of your eye primer runny.

The ratio of the moisturizer/body butter should be same or teeny less than the concealer.  What the moisturizer does, is to retain the moisture on your lids underneath all that eye shadow. I am using this parachute body lotion.

The ratio you want to work in is 2:1:1 that is 2 parts foundation, 1 part concealer and 1 part moisturizer.

Step4

Mix it well with the help of a toothpick and store it away well. Always use a brush to apply the product to avoid spreading any germs and always pat some powder on top of the eye shadow primer to help it not to crease.

I wouldn’t really recommend making huge batches of the eye shadow primer. Make a batch that’ll not last you more than 1-2 months. You require a really small amount for each use.

Done

I have used this eye shadow primer for more than 8 hours and it lasted me without creasing or fading my eye makeup.

Editor’s Note: That sounds like a good eye primer. I would also recommend adding a little glycerine in place or addition to the body butter, just a tiny amount.

Have you tried DIYing eyeshadow primer?

Top 10 Beauty & Fashion Trends of 2016

Top 10 Beauty & Fashion Trends of 2016

Guest Post

The year 2016 is half gone. Yes we’re past June! So today I’m sharing some latest beauty and fashion trends of the year so far. Let’s begin. 😀

1. Bubble Eyeliner – Still trying to ace winged eyes? You better not! As bubble eyeliner is the newest funky makeup trend. It is a sort of bumpy eyeliner which was discovered by the beauty Youtuber, Jenny Gonzalez. Since then it has been spreading wide on Instagram.

2. Choker – The choker is back and with a bang. You must have already spotted it as they’re literally everywhere, from Bollywood to neighborhood. 😉

It’s quite easy to carry a choker and you must give it a shot, if haven’t already.

3. Cold Shoulder – Also known as off shoulder, this popular trend from the 90’s is back. It has become a must to have an off shoulder top.

It goes well with the choker, a perfect pairing with which you can never go wrong.

4. Bold Brows – It’s time for going bold with thick eyebrows. Ditch those thin arched regular look and experiment something different and quirky.

Bollywood stars such as Sonam Kapoor, Priyanka Chopra among others have been spotted rocking this trend. Here Sonam is sporting another new makeup trend i.e. Reverse Winged Eyeliner or also known as Upside Down Cat Eye Look.

5. Liquid Lipstick – Haven’t heard of them yet? Then let me tell you, it is the new kid on the block which has garnered much of acclaim recently.

Liquid lipstick has a great staying power and offers pigmentation of a lipstick and shine of a lip gloss. You can always blot it out to achieve a matte look, if it is glossy. You get matte liquid lipsticks too.

6. Ombre Lips – It’s a Korean beauty trend where you’re combine two tones of colors. Ombre lips look absolute gorgeous and is often sported by models on runways. I would suggest you to initially begin with more wearable colors rather than the darker shades.

7. Peel off Lipstick – You love makeup and then you love tattoos. So do you love makeup tattoos? It’s a peel off and apply concept originally from South Korea. It’s quite long lasting, upto 12 hours. Though it must be used with a bit of care as it may hurt your pretty pout.

8. Rainbow Highlighter – All thanks to an Etsy shop Bitter Lace Beauty for bringing out Prism, the rainbow highlighter. This highlighter does the perfect job to highlight your cheekbones with rainbow colors. Exciting right? But if you can’t wait to own one, then you can DIY one as the net is flooded with quite creative ideas.

9. Clown Contouring – As the name suggests, clown contouring means to make a clown of yourself by oozing lots of makeup on your face. Only to arrive at a perfectly blended and contoured look. YouTube beauty vlogger, Esther who came up with this beauty trend remarks it as a fun approach to contouring.

10. Sheer Trend – It’s one of the biggest summer fashion trend. It’s quite common among the celebs but not easy to carry as it can lead to over exposure too. But the effortless way to add it to your wardrobe is a sheer back crop top or sheer neckline blouse with a saree. If you’re really in awe of this trend then you can also go for the skirts which look quite fabulous.

That’s all about the top 10 beauty and fashion trends of 2016. Have you tried any of these? Do share in the comments below.

About Me – I’m Aisha, 19. I’ve a personal blog, Jhalli Diva where I share my love for beauty, fashion and lifestyle.

Blog URL – www.jhallidiva.com

Editor’s Note: Very well compiled post Aisha! Do check out her blog guys, she has an interesting mix of beauty & fashion.

Image Source: 1,2,3,4,5,6,7,8,Instagram,Pinterest

Must have Bags in Every Girl’s Closet

Must have Bags in Every Girl’s Closet

By Pallavi

Hiii Fashionistas, We all are crazy about accessories, accessories are something that make or break your look. And handbags are something really detrimental for your look.

You need different types of handbags for different occasions. Have a look at some of the MUST have handbags in your stash –

Shoulder Bag

1. Shoulder Bag – These are the most common handbags which you can easily carry on your shoulders. They have to be carried on your shoulders through the straps attached to them. They come in different shapes and sizes and patterns too. This one is perfect for both formal and semi-formal looks.

Sling

2. Cross Body or Sling Bags – These are so trendy and in these days. They are perfect for even outings while you are travelling or a day brunch or night out. They are small in size but are perfect to carry your essential things.

Clutch


3. Clutches – These are for those occasions when you want to carry a small bag but you are not comfortable with the shoulder straps thing. You just want to carry your bag in your hands, then clutch is perfect. It comes in different designs and you can pick as per the occasion.

Satchel

4. Jhola or Satchel Bags – The big bags which just need to be loosely held on your shoulders. They have a good space inside it where you can store a number of things. They are perfect for students or for travel enthusiasts.

Tote Bag

5. The Tote Bag – This is so trendy and comfortable to carry. They are made up of soft clothing material which is not only easy and comfortable to carry but also inexpensive. You can carry a lot of stuff in totes.

Weekender Bag

6. Weekender – These are the large bags wherein you can carry your world inside it. they come in different shapes but all of them have huge space inside them. You can use them as gym bags, diaper bags, grocery bags and likewise.

Bucket Bag

7. Bucket Bags – Another trendy and new in market bag. They are in the shape of a bucket as goes the name. They come with adjustable shoulder straps which you need to tighten in order to close it.

Backpack

8. Backpacks – Best bag for travel enthusiasts. They come with a huge space inside wherein you don’t need to arrange your stuff just throw them in. And they come with adjustable straps so you can tighten them as per your choice.

Duffle

9. Duffle Bag – A spacious bag perfect for travelling for short trips. You can also use them as a sports bag too.

Messenger Bag

10. Messenger Bag – This is another roomy bag with very long shoulder straps. You can even style them as a cross body bag or you can wear them loosely hung over shoulders bag.

Envelope Clutch

11. Envelope Clutch – Another trendy bag more like a day time clutch. It comes in the shape of a envelope which is slightly large in shape.

So, that were some of the must have handbags from my side. Hope you like them. Let me know your thoughts in the comments down below.

Image Source: 1,2,3

Editor’s Note: You have covered each and every type Pallavi, nice post.

Which is your favourite? Currently I am loving bucket bags and backpacks. Totes are of course a favourite!

Summer Skin Care Tips & Home Remedies

Summer Skin Care Tips & Home Remedies

By Rashmi

Hello lovelies,

Summers are back and with a bang. Nobody likes summers as they bring with them innumerable skin woes. But don’t you people worry. I have got it all covered for you people with easy solutions to keep your skin fresh and glowing. Thank me later

1. SUNSCREEN –

Use sunscreen whenever you are going out and make sure it is at least SPF 30 or choose from what suits you. Sunscreens protect your skin from harmful UV rays and prevent it from getting damaged.

2. CLEANSER –

The cleanser helps to unclog pores and it should be used as a part of a skincare regimen. During summers it becomes even more important to use a cleanser as the skin becomes lifeless and the pores get clogged. Make your own cleanser by mixing yogurt and honey. Apply it on your face and let it stay for 20 minutes and then wash it off to get clear skin.

3. EXFOLIATE –

Exfoliation is a must for the skin. Dead skin needs to be removed as they make the face look dull. Make your own exfoliator by mixing oatmeal, honey, and milk. Apply it on the face and let it sit for 10 mins then start scrubbing the face gently with wet hands. Scrub slowly for 5 minutes and then wash it off with water.

4. TONER-

Toners make you feel refreshed instantly. Make a refreshing toner by simply mixing cucumber juice with rosewater. Store it in the refrigerator to give it a longer life. Though use it only for a week and then make a new one. Carry it with yourself when going out. Spray it on your face to give your face instant relaxation.

5. MOISTURISE –

This step is what many people avoid during summers. Change your moisturiser to an oil-free one. Moisturisers are required by the skin in every season. It becomes even more important to use a moisturiser after exfoliation to lock the nourishment back into the skin. Mix your night serum with your moisturiser and apply it to your face to give the skin all the goodness that it needs.

6. KEEP YOURSELF HYDRATED –

Drink as much water as you can. During summers this is certainly the most important thing. Drink a minimum of 8 glasses of water a day. And do not wait for your mouth to get dry. Try drinking refreshing juices like watermelon juice or lemon water.

RANDOM SKIN CARE TIPS-

1. Rub ice all over your face to instantly soothe your skin. But make sure you cover it with a muslin cloth, never apply ice directly to your skin.

2. Apply calamine lotion to soothe skin rashes.

3. If you are out of toner, simply apply cold rosewater on your face to calm and soothe the skin.

4. Avoid oily and fried food. Include lots of fruits and veggies in your diet.

Editor’s Note: These are such basic things Rashmi, but we always tend to take them for granted. Articles like these remind me to follow things sincerely. One thing I would like to add and which I also follow is carrying a thermal spring water and spritzing it time and again, be it Avene, Vichy, La Roche Posay,etc.

Image Source: 1,2,Getty

Do you follow all these summer skin care tips?

Step By Step Description of How to Do Hair Spa At Home

Step By Step Description of How to Do Hair Spa At Home

By Sanchita

The idea behind the hair spa is to rejuvenate and protect the hair. Yes, the good old warm oil massage and mild shampoo followed by conditioner is the regular or weekly routine carried on by us to protect and condition the hair. But, apart from that the hair needs specific care and rejuvenation by the process of hair spa. Now, hair spa is not necessarily done in parlors or hair care institutions and can be easily carried on at home with specific and easy available ingredients at your own volition. So you need not spend valuable money or time at the spa session every time. Let us see the step by step description of how to do hair spa at home.

1. Hair Oil

When you are going to devote yourself to the self-spa session, avoid using the readymade oils from the market which are nothing but merely mineral oils. So it will do no good to the hair. Use a concoction of hair oils like coconut oil, castor oil, almond oil and olive oil. The mixture should be 4parts coconut oil, 1 part castor oil, 2 parts almond oil and 3 parts olive oil. You can add other essential oils like argan, rose, ylang ylang or lavender as per your choice. Warm up the oil in a double boiler (no direct heat) and you can also add various herbs as well. For e.g. dried amla, methi seeds, neem leaves, hibiscus leaves paste, etc. can also be added in the warm oil which will further strengthen the hair. The hair oil is the vital step and best if it is done for.

2. Through massage

While the oil is the most important ingredient, the massage is the process which completes the procedure partly. Simply applying the oil won’t do so make sure you dedicate a good amount of time to massage the scalp well. Do not vigorously rub the scalp but merely run the fingers in a circular motion covering the whole area of the scalp. Massaging is essential as it improves blood circulation in your scalp area. You should massage your hair for 10 to 15 minutes. It helps relax the scalp and increase softness. It further aids in strengthening the roots of the hair and nourishes the hair-shafts, promoting new hair growth and strengthening current hair.

3. Warm Towel

If you have applied the oil a night before, then apply the warm towel in the morning and if you have applied the hair oil in the morning, do this at least an hour or two post oil massage. Dip a towel in warm water (just make sure not to burn the hand) and wrap it around the hair. In general, salons use a stream machine but the warm towel will surely do the trick. Warmth open up the pores on the scalp and thus it gets all the benefits of the oil. Also, it cleanses the scalp thoroughly, thereby promoting healthy hair growth.

4. Henna Mask

There are several hair masks available for hair and you can include the ingredients like ripe banana, eggs, curd, mayonnaise, etc. but I would suggest henna. Personally I have benefited a lot from the henna hair packs and it works like wonder. Henna is an age old method widely used in Ayurveda for treating hair and scalp problems. It is one of the best natural remedies for hair growth, helps to prevent dandruff and scalp itching. It acts as a good conditioner for your hair and helps to grow your hair. Mix the henna powder in the form of a paste with the help of curd or lemon and simply apply on the hair.

5. Shampoo

Once the hair mask is dried or after 40-50mins, wash off the mask with plain water. The rinsing will be easy as the hair as already well-nourished with oils. Next, move on to the main process of shampooing the hair. Try and use a SLS and PARABEN free shampoo which is mild and easy on the hair. Using a harsh chemically enriched shampoo means whatever effort you gave would go down the drain and the hair will be frizzy, rough and unmanageable. Shampoo will cleanses off every layer of dirt, grime, dandruff or any other residual substances on the hair, including the hair oil and hair pack. Although, the hair would retain the benefits for sure. One of the most important thing is that, rinsing off the shampoo is very important. A lot of people do apply it correctly and massage onto the scalp but forgets to rinse it out.

6. Conditioner

After the shampoo, apply the conditioner to the length of hair and keep it for around 2-3mins and no longer than that. Make sure the conditioner doesn’t slips onto the scalp and gets rinsed out properly after the shampoo.

7. Leave in Serum

This is the last step but I would call it optional. Since I have curly and dry hair, I always apply a leave in serum to make it manageable and frizz free but it is completely up to you. Also, I would not advise this step if you have thin and flat hair because it may weigh the hair down as the hair has already been conditioned since step 1.

These are the ways you can easily carry on the hair spa at home without shelling big bucks and also at our own convenience.

Editor’s Note: Absolutely loved this post Sanchita. This is the ideal procedure, wish I was not that lazy and time crunched :/ But even once a week or once in 2 weeks, following this routine would be amazing.

Image Sources: 1,2,3,4,5,6,7,8

Do you do hair spa at home?

Decoding the Makeup Secrets of Adele

Decoding the Makeup Secrets of Adele

By Sanchita

When I think of Adele the only two things that crosses my mind are the deepest ballads and feline eyeliner. I mean, that is the thickest, precise and deepest eyeliner I have seen. No matter what product I have used so far, I simply couldn’t get that look. Thankfully, a couple of months back Adele’s Makeup artist Michael Ashton, who has been working on the singer’s hair and makeup for nine years shown in a YouTube channel of MUA Lisa Eldridge. There was so much to learn from him and I loved the way he had shown the makeup tutorial. So, gathering the most important points from there, I have decoded the makeup secrets of Adele and here’s what you need to know.

Preparing the Skin

Makeup artist Michael Ashton starts prepping the skin with a damp facial tissue soaked in Bioderma Sensibio H2O to wipe off any layer of residual makeup, dirt, grime etc. He advises to use a facial gel or oil kind of product to plump up the skin and hydrate it well enough for the foundation to look flawless. He used a rose facial oil I believe to plump up the skin and which also gives a natural strobing effect without looking greasy, sticky or oily. His favorite product is Aromessence Rose d’Orient Oil Serum for pre foundation technique.

Eye Makeup

He started with a base product which act as a base for eyeshadow as well as primer. He used the MAC Paint Pot Groundwork all over the lid and then soften the crease using a blending brush. He also applied the same pain pot in the lower lash line to give a shadow sort of. Then used the two lightest shade (a golden bronzy light color) from the Tom Ford Nude Dip Eye Color Quad all over the lid and smoothened the line as well. This gave a nice reflective kind of pale look to the eyes, you can also call it neutral.

Infamous Feline Eyeliner

The secret behind that gorgeous feline liner are the gel liner, eye liner and fine liner brush. He uses the Bobbi Brown Long Wear Gel Eyeliner in Black Ink on the back of your hand and then start drawing a line (as close as you can to your lash line) from the middle of your eyes working it outwards, using a very fine liner brush. Then, he makes the feline stroke giving a cat liner effect. He repeated the lines at least 6-7 times which thickened and deepen the color even more. Ashton states that you can use a cotton bud dipped in Bioderma Sensibio H2O to wipe off any mistakes. After the mascara, he goes back to the eyes, this time with liquid eyeliner, that is, MAC Liquidlast Liner Point Black. He said that he uses a liquid liner with a tar consistency and a fine brush to do a final eyeliner swipe. This builds up intensity and gives a nice depth to the eyes as well.

Dramatic Eyelashes

For the lashes, he used a falsies using Duo lash black glue which gives a well-defined matte charcoal finish. He used a gentle upward lifting motion with the fingers to blend in with the natural lashes. Next, he applied the Diorshow Mascara for the upper lashes. For the lower lashes, he used a small fan brush and started from the roots which would give a better smudged kohl effect. He stated that it won’t matter if the mascara goes a little bit onto the waterline as long as it doesn’t sting.

Strong Brow Game

Before stating the eye makeup, he used a spoolie to brush the eye brows. Then used a soft brow pencil to shape and define them. Clean up the top of your brow using a moisturizer on a small concealer brush and swipe it across the brow. To set the pencil he used a light mix of four brown shades – MAC Concrete, Coquette, Corduroy and Wedge and applied as the brow powder.

Foundation

For the foundation he used Estee Lauder – Double Wear Light and mixed the shades 1.0 and 0.5. He used the lighter shade on the T-zone and inner portion of the face while the darker one in the outer perimeter. He specifically stated that the foundation must be applied on the jaw line and below i.e. towards the neck. This will surely give a nice, smooth and even look. He sets everything with a fine milled compact powder. For the under eyes, he uses the Tom Ford Illuminating Highlight Pen and blends it with a brush.

Contour

For the contour also, he uses a powder palette which is the Smashbox Step by Step Contour Kit and mixes the first two colors for the cheek bones. He basically says that a fish face helps to make the contour precise and smooth. He uses an angled blush brush for the contour and applied for the forehead, sides of the nose and jawline. For the blush, he loves the Maybelline cream blush which works really great for blending.

Lip Trick

For the lips, prep and prime the lips with a nourishing lip balm to hydrate the lips well. Then, he used a neutral lip liner to outline and fill the lips slightly. Use a finger to pat and blend the lip liner with the lip balm to give a nice and even neutral look to the lips. Use a shimmery gloss to apply on the centre of the lower and upper lips and blend well. This would give a nice plump effect to the lips naturally.

These are the secrets of Adele’s flawless feline makeup look and I really hope this would help you guys to recreate her looks easily.

Image Sources: 1,2

Editor’s Note: I love Adele’s makeup, especially her winged liner. Nice post Sanchita

Did you always want to know Adele’s makeup secrets? Well they are not a secret anymore 😀